

The actual process of moving to Spain from India involves a sequence of steps that must happen in the right order. If you submit documents in the wrong sequence, miss an apostille, or skip your empadronamiento in the first week then you delay your entire residency timeline by months.
Before you start collecting paperwork, few decisions need to be made that will shape everything that follows.
Decide your visa category with certainty.
Your visa category determines which documents you need, which consulate process you follow, and what your life looks like in Spain for the next several years. Changing your mind after submitting an application is not a minor inconvenience, it means starting over.
Decide which city you are moving to.
This matters more than it sounds at the bureaucratic level. Spain's immigration system is regionally administered. Your work permit (if applicable) is tied to the province where you will work. Your empadronamiento (municipal registration) is done in the specific municipality where you live. Your TIE application is filed at the Foreigners' Office or National Police station in your province. Knowing your destination city lets you research the specific local process and timelines.
Find a reputable Spanish immigration lawyer early.
This is not mandatory but advisory, professional legal support reduces the risk of rejection. Even for the DNV, a lawyer can review your document package before submission. Many Indian expat communities in Spain have recommendations for lawyers who are experienced with Indian applicants specifically.
This is where the process actually begins in India.
An apostille is an internationally recognised certificate that authenticates the origin of a public document. Spain is a signatory to the 1961 Hague Apostille Convention, as is India. What this means is any Indian government-issued document you submit to Spanish authorities must carry an apostille stamp from India's Ministry of External Affairs (MEA) to be considered legally valid in Spain. Without an apostille, your Indian documents are simply pieces of paper as far as Spanish immigration is concerned. This is non-negotiable.
Which Documents Need to Be Apostilled?
The exact list depends on your visa category, but the following are required across most visa applications:
Which documents do not need an apostille?
Documents like Bank statements, employment contracts, and company documents are generally not government-issued documents and do not require apostille, though they may require certified translation.
How to Get an Apostille in India?
The process has two stages for most documents:
Stage 1: State-level Attestation
Before the MEA can apostille a document, most documents must first be attested by the State Home Department or State Education Department in the state where the document was issued. For example, a birth certificate from Maharashtra, must be attested by Maharashtra's authorities before going to the MEA. This state-level step is where timelines vary most, some states process in 1-2 weeks, some take 4-6 weeks.
Stage 2: MEA Apostille
Once state-attested, documents go to the MEA for the apostille stamp. This takes 3 to 7 working days once the document is physically received. The MEA apostille is the final authentication that Spain will accept.
With your apostilled and translated documents ready, you now formally apply for your long-stay visa. For most Indian applicants, this process does not begin at the consulate door, it begins with BLS International.
BLS International- Your First Point of Contact
BLS International is the official outsourced visa application service provider authorised by the Spanish government to collect visa applications across India. This means that instead of submitting your application directly at the Spanish consulate, most applicants book their appointment through BLS, submit their documents at a BLS centre, pay their fees there, and have BLS forward the complete application to the Spanish consulate for processing and decision.
BLS has visa application centres in multiple Indian cities including Delhi, Mumbai, Bangalore, Chennai, Kolkata, Hyderabad, Ahmedabad, and others, making it more accessible than the two consulate locations alone. The appointment booking, document checklist guidance, and submission all happen through BLS. The consulate itself handles only the assessment and decision.
Important: Always use the official BLS Spain visa portal for India to book appointments, check current document requirements, and confirm BLS centre locations and fees before applying. BLS service fees are charged separately from the Spanish consulate visa fee and are non-refundable. Verify current details at the official BLS website before submitting anything.
Which Consulate Covers You?
While BLS handles the intake, your application is processed by one of the two consular offices in India authorised to assess and issue Spanish long-stay visas, determined by your permanent residential address in India.
Embassy of Spain in New Delhi- Consular Section
This covers Delhi NCR, Uttar Pradesh, Rajasthan, Punjab, Haryana, Himachal Pradesh, Uttarakhand, Jammu and Kashmir, Ladakh, Bihar, Jharkhand, Odisha, West Bengal, Assam, Sikkim, Arunachal Pradesh, Nagaland, Manipur, Meghalaya, Mizoram, Tripura, Chandigarh, Lakshadweep, Andaman and Nicobar Islands, and the countries of Bhutan, Maldives, Nepal, and Sri Lanka.
Consulate General of Spain in Mumbai
This covers Maharashtra, Goa, Gujarat, Karnataka, Kerala, Tamil Nadu, Andhra Pradesh, Telangana, Chhattisgarh, Madhya Pradesh, and Union Territories of Dadra and Nagar Haveli, Daman and Diu, and Puducherry.
Note for residents of Bangalore, Chennai, Kolkata, and surrounding states: India also has Honorary Consulates in Bangalore and Chennai, and a currently closed Honorary Consulate in Kolkata. Honorary Consulates cannot process visa applications for Indian nationals. Your application must go through BLS and will be processed by the Consulate General in Mumbai, which covers your jurisdiction.
How to Book Your Appointment?
Appointment slots through BLS for Spanish long-stay visas in Delhi and Mumbai jurisdictions, fill up weeks to months in advance. During peak periods, wait times can stretch to 8 to 14 weeks. Book your appointment through the BLS portal the moment you have decided on your visa category, even if your documents are not yet fully ready. You can continue preparing and apostilling documents while waiting for your appointment date.
What to Expect at the BLS Centre on Your Appointment Day?
On your appointment day, you attend the BLS centre - not the consulate, with your complete document package. BLS staff will check that all required documents are present, correctly apostilled, and translated where required. They will collect your biometric data. Once your submission is accepted, BLS forwards your application to the relevant consulate for assessment.
Common reasons for rejection or delay and how to avoid them:
While waiting for your visa, use the time to handle several practical matters that will make your first weeks in Spain smoother.
Arrange accommodation for arrival.
You need a confirmed address in Spain either a signed lease agreement or a confirmed booking for your visa application.
Inform your Indian bank.
Notify your Indian bank that you will be travelling to and residing in Spain, so international transactions on your debit and credit cards are not flagged and blocked. Also check your card's international transaction fees and withdrawal charges.
Transfer initial funds.
You will need money available in Spain from day one- for rent deposits, initial living costs, and bureaucratic fees. Services like Wise offer better exchange rates than bank wire transfers for sending money from India to Spain. Note that transfers from India are subject to RBI's Liberalised Remittance Scheme (LRS), which allows Indian residents to remit up to USD 250,000 per financial year for permitted purposes including travel, education, and maintenance of close relatives abroad.
Sort your health insurance.
If your visa category requires private health insurance, confirm your policy is active, covers Spain from your date of arrival, and that you have the policy documents accessible- both digitally and in print.
Download essential apps before leaving India.
Idealista or Fotocasa (housing), Google Translate with Spanish downloaded offline, Citymapper for public transport in Madrid or Barcelona, and WhatsApp groups for Indian expats in your destination city.
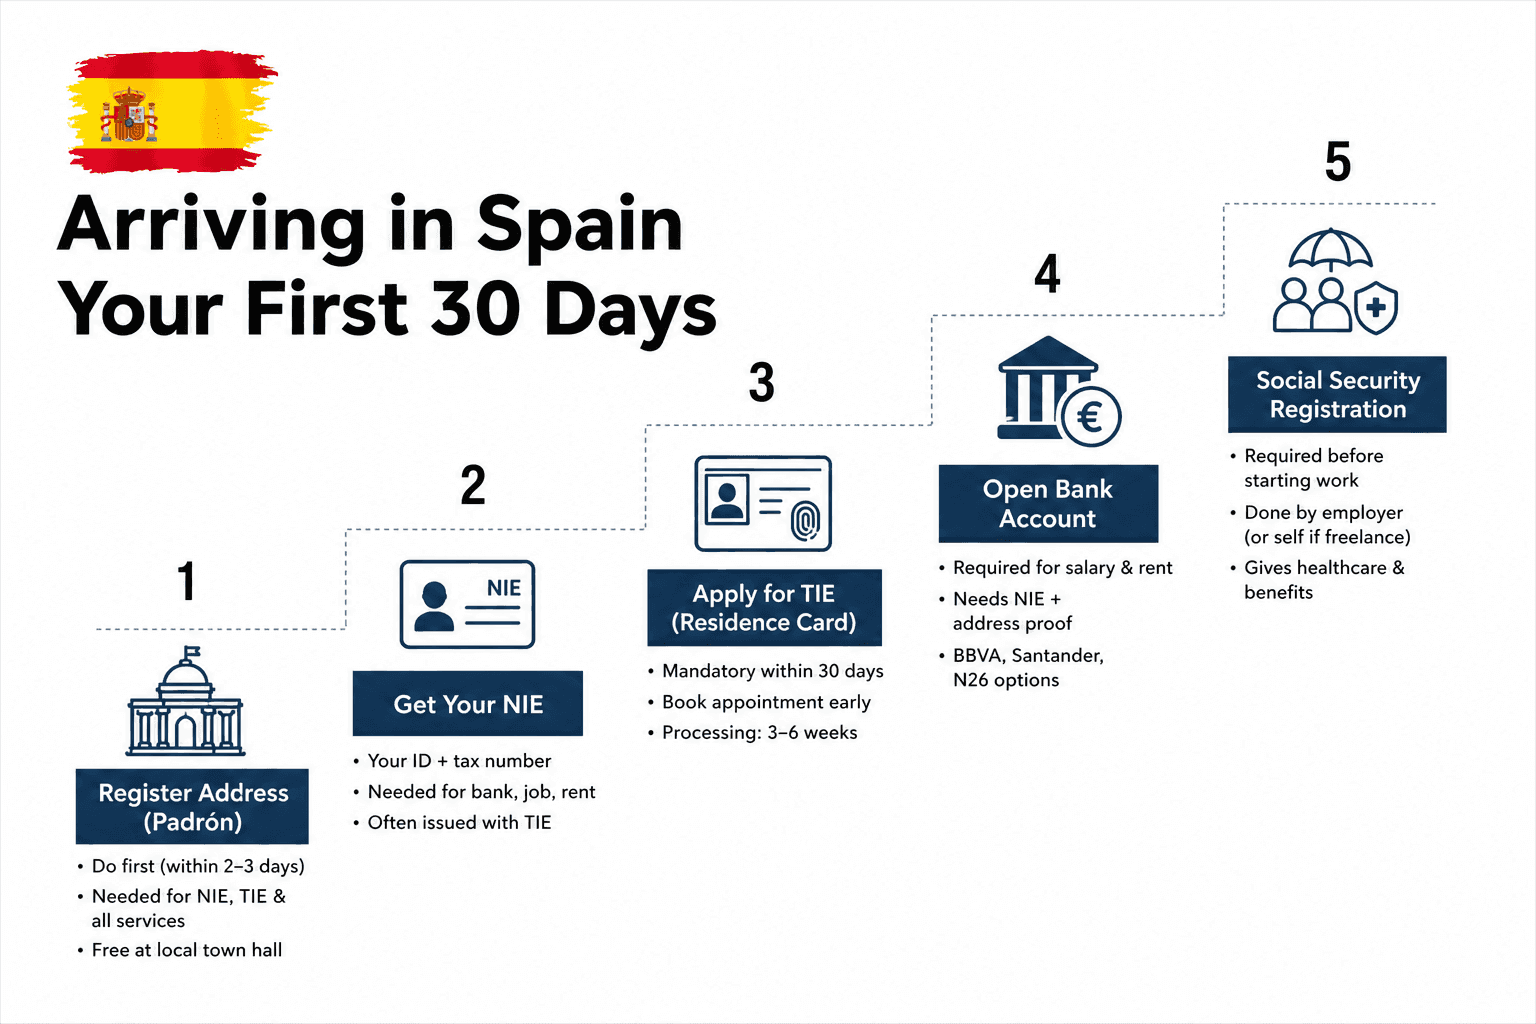
The first month in Spain is the most important of your entire stay. Several registrations must happen within defined legal timeframes, and missing them creates complications that are difficult and time-consuming.
Register Your Address First- Empadronamiento/Padron
The very first thing you must do upon arriving in Spain- before applying for your NIE, before applying for your TIE, and before almost anything else is to register your address at the local town hall (Ayuntamiento) of the municipality where you live. This process is called empadronamiento or padrón, and the certificate it produces is a required supporting document for virtually every subsequent step in your legal settlement in Spain.
Empadronamiento is not optional and it is not a formality. Without it, your NIE and TIE applications are incomplete. Your padrón certificate is required for:
How to register: Visit your local Ayuntamiento with your passport and a signed lease agreement or proof of your address in Spain. Some municipalities allow online appointment booking and some require you to go in person. In Madrid and Barcelona, appointments can be booked through the respective city council websites. There is no fee. You will receive the certificate on the same day or within a few days. You need to keep multiple copies, as you will use it repeatedly. Do this within the first week of arrival, ideally within the first two or three days.
Get Your NIE
Once you have your empadronamiento certificate, your next step is securing your NIE (Número de Identidad de Extranjero). This is your personal tax and identification number in Spain. The NIE is not a card or a document you carry. It is simply a number without which you cannot open a bank account, sign a lease, register with Social Security, buy a car, or handle any formal transaction in Spain.
For long-stay visa holders arriving in Spain, the NIE is automatically assigned as part of the TIE (residency card) application process. It becomes your permanent identification number embedded in your TIE. You do not always need to apply for it separately.
However, if you urgently need the NIE before your TIE is processed. For example, to open a bank account or register with Social Security from day one of employment, you can apply for it independently at a National Police station that handles foreigners' affairs, using Modelo EX-15. You will need:
Apply for Your TIE
The TIE (Tarjeta de Identidad de Extranjero) is your physical residency card. It is what formally makes you a legal resident of Spain. For most long-stay visa categories, you are legally required to apply for your TIE within 30 days of arriving in Spain.
Where to apply: At the Foreigners' Office in your province, or at a National Police station designated for foreign affairs. Appointments must be booked in advance, as TIE appointment slots fill up quickly. Book your appointment online through the Spanish police's sede electrónica immediately upon arrival, even before your 30-day window begins.
Documents required for TIE application:
Processing time: The TIE is ready for collection in 3 to 6 weeks after your appointment, though this varies by province. You will be given a receipt after your appointment, which serves as temporary proof of your legal status while your card is being processed. Keep this receipt you will need for certain administrative processes in the interim.
Open a Spanish Bank Account
A Spanish bank account is essential for receiving salary, paying rent, setting up utilities, and dozens of other daily functions. Opening one as a newly arrived foreigner requires your NIE , proof of address (empadronamiento certificate), and in some cases proof of income or employment.
Banks that are more accessible for newly arrived Indians:
Register with Social Security
If you are employed or self-employed in Spain, registration with Spain's Social Security system is mandatory and must happen before or on your first working day. Your employer handles this registration if you are employed. If you are self-employed, you register yourself through the Tax Agency and with Social Security.
Your Social Security number is separate from your NIE but linked to it. It is what entitles you to Spain's public healthcare system, unemployment benefits (if applicable), and pension contributions.
If you spend more than 183 days in Spain in a calendar year, you are considered a Spanish tax resident for that year. Days do not need to be consecutive. Once you cross this threshold, Spain taxes you on your worldwide income, not just income earned in Spain. This includes your Indian salary, rental income from Indian property, dividends from Indian stocks, interest from fixed deposits, and any other global income source.
If you are arriving as an employee or qualifying professional, you are eligible for Spain's Beckham Law- a flat 24% tax rate for your first six years in Spain. The application window is strictly 6 months from your Social Security registration date. If you miss it and it is gone permanently. Flag this to a tax advisor the moment you register with Social Security.
If you have Indian bank accounts, investments, mutual funds, property, or pension assets above €50,000 in value, you are required to declare them to Spanish tax authorities.
Your Indian driving licence is recognised in Spain for a limited period after you become a legal resident. Once you have your TIE, this means you are formally a resident, not just a visitor- your Indian licence is valid for driving in Spain for 6 months from the date your residency is established. After that 6-month window, you are legally required to hold a Spanish driving licence to drive in Spain.
Can You Exchange Your Indian Licence for a Spanish One?
This is where many Indians are misled by incomplete information online. India and Spain do not have a bilateral driving licence exchange agreement. This means you cannot simply swap your Indian licence for a Spanish one. There is no administrative exchange process available for Indian licence holders, unlike citizens of certain other countries (such as Switzerland or Japan) who can exchange directly.
As an Indian licence holder, you must go through Spain's standard driving licence acquisition process which means:
Theory test: A multiple-choice test covering Spanish traffic rules, road signs, and driving regulations. The test is available in English at most driving schools which is important for Indian applicants who are not yet fluent in Spanish. The theory test consists of 30 questions, and you must answer at least 27 correctly to pass.
Practical test: An on-road driving test conducted by a DGT examiner, in a vehicle provided by the driving school. The test assesses your ability to handle Spanish roads, follow traffic rules, and demonstrate safe driving behaviour.
Your Indian driving licence serves as evidence of your prior driving experience and history, and driving schools take this into account when structuring your training.
Tips for the Licence Process
Enrol in a driving school early- do not wait until the 6-month window is about to close, as test slots can be booked out several weeks in advance. Costs vary by city. Keep your original Indian driving licence safe throughout this process, you will be asked to surrender it to Spanish authorities when your Spanish licence is issued.
Beyond taxes and driving, the first three months in Spain involve a handful of practical setups.
Health Card
Once registered with Spain's Social Security system, you and your registered family members are entitled to access Spain's public healthcare which is one of the best in the world. To actually use it, you need a health card (Tarjeta Sanitaria Individual), which is your personal access card to the public health system.
Apply for it at your local health centre with your TIE, NIE, empadronamiento certificate, and Social Security registration document. The card entitles you to GP consultations, specialist referrals, hospital treatment, and heavily subsidised prescriptions. Apply for this as soon as your TIE and Social Security registration are in place.
Phone and Internet
For a mobile phone contract in Spain, you need your NIE. Until your NIE is confirmed, a prepaid SIM from any Spanish operator works as a bridge. Once your NIE is in hand, you can take out a contract plan.
Spain's main operators are Movistar, Orange, Vodafone, and MásMóvil. Budget operators are Digi and Yoigo, these have become extremely popular among the expat community for their competitive pricing with solid coverage. Digi offers very affordable monthly plans and has become a first choice for many Indians in Spain. For home internet, fibre broadband is widely available across Spanish cities at speeds and prices that will likely exceed what you were used to in India.
Children's School Enrolment
If you have school-age children, enrolment in Spanish public schools is free for compulsory education and is managed by the Consejería de Educación of your autonomous community rather than handled directly by the school. You will need documents such as your child’s birth certificate (often apostilled or officially translated), empadronamiento certificate, proof of legal residence (such as a visa, NIE, or TIE), and previous school records. Requirements and procedures may vary slightly by region.
The main enrolment window runs from March to May for the following academic year. If you arrive outside this window, contact the regional education authority directly as they have provisions for mid-year enrolments for newly arrived families.
Spanish public schools have language support programmes for non-Spanish-speaking children. Most Indian children with an English-medium schooling background adapt to the Spanish system within one academic year.
Spanish Language Learning
If you have not already started learning Spanish, enroll in a course as soon as you are settled. Spain's Escuelas Oficiales de Idiomas (EOI)- official state language schools, offer subsidised Spanish courses for residents at a fraction of private school costs, though fees vary depending on the region. The quality is excellent and the EOI system is widespread across Spanish cities and towns.
Beyond the daily need for Spanish, remember that a DELE A2 certificate is required for the Spanish citizenship application after 10 years. Starting formal language learning in year one rather than year eight makes the entire journey smooth and less stressful. This also opens up your social and professional life in Spain far more quickly than staying within the English-speaking expat bubble.

